Blog Post – Coffee Craft Techniques
There’s something undeniably heartwarming about crafting the perfect coffee at home, especially when it involves transforming a simple cup into a work of art. Whether you’re a coffee aficionado eager to master the delicate balance of espresso and milk or a novice just beginning your journey into the world of latte art, there’s always something new to learn. From the science of steaming milk to the whimsical designs that can dance atop your latte, enhancing your coffee routine can be as satisfying as the first sip itself. Join us as we explore the techniques and tips that will elevate your home brewing skills, turning every cup into a delightful experience worth sharing with friends and family. Grab your favorite mug, and let’s embark on this aromatic adventure together!

Mastering Steamed Milk Preparation
Let’s dive into the art of steaming milk, a crucial skill for any coffee enthusiast. Mastering this technique will elevate your homemade coffee to new heights.
Tips for Perfect Steamed Milk
Achieving the perfect steamed milk is all about technique and practice. Start by using cold, fresh milk for the best results.
-
Fill your pitcher about 1/3 full with cold milk.
-
Submerge the steam wand just below the milk’s surface.
-
Turn on the steam and create a whirlpool effect.
-
Listen for a gentle hissing sound – that’s your cue for proper aeration.
As the milk heats, lower the pitcher to incorporate the air bubbles evenly. Aim for a smooth, glossy texture with tiny, uniform bubbles.
Remember, different milk types steam differently. Whole milk tends to produce the richest texture, while plant-based alternatives may require extra attention to achieve that silky consistency.
Enhance Your Coffee Experience
Perfectly steamed milk can transform your coffee experience. It adds a creamy sweetness that complements the coffee’s natural flavors.
For lattes, aim for a velvety microfoam that blends seamlessly with the espresso. This creates a harmonious balance of flavors and textures.
In cappuccinos, focus on creating a lighter, more airy foam. This allows the espresso to shine through while providing a delightful contrast in mouthfeel.
Experiment with different milk-to-coffee ratios to find your perfect balance. Don’t be afraid to adjust based on the coffee’s roast level or origin characteristics.
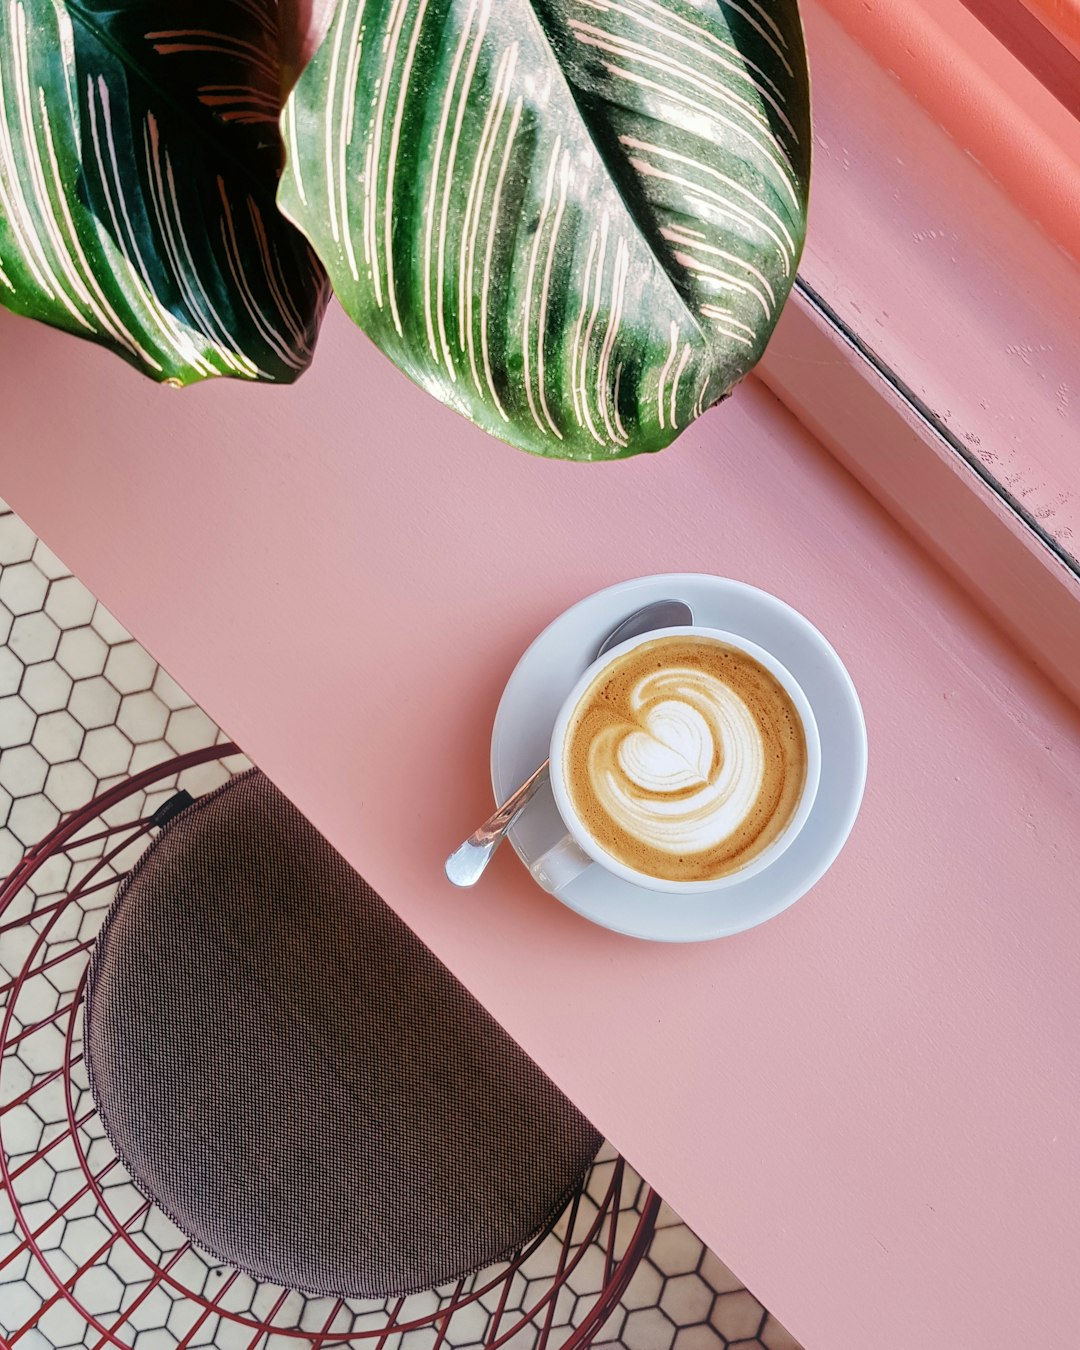
Latte Art Techniques
Latte art is where coffee meets creativity. It’s a chance to add a personal touch to every cup you serve.
Create Beautiful Coffee Designs
Creating beautiful latte art starts with mastering the basics. Begin with simple designs like the heart or rosetta.
-
Pour steamed milk slowly into the center of your espresso.
-
As the cup fills, raise the pitcher slightly and increase flow.
-
Move the pitcher gently from side to side to create your design.
-
Finish with a quick “cut” through the design to define its shape.
Practice is key. Don’t get discouraged if your first attempts aren’t perfect. Even professional baristas spend years honing their skills.
Try different pouring speeds and heights to see how they affect your designs. Small adjustments can make a big difference in the final result.
Unveil Latte Art Secrets
The secret to stunning latte art lies in the details. Ensure your espresso has a good crema and your milk is perfectly steamed.
Timing is crucial. Pour too soon, and your design may sink; too late, and it won’t integrate well with the espresso.
Experiment with contrast by using chocolate powder or flavored syrups to create multi-colored designs. This adds depth and visual interest to your creations.
Remember, latte art is as much about feel as technique. Develop a sense for how the milk moves and responds to your pouring style.
Top Coffee Steaming Tips
Steaming milk is an art form that can elevate your coffee from good to great. Let’s explore some pro tips to perfect your technique.
Achieve a Creamy Finish
The key to a creamy finish lies in creating microfoam – tiny, uniform bubbles that give milk a silky texture.
Start with cold milk and a clean steam wand. Position the wand just below the milk’s surface at a slight angle.
Listen for a gentle ‘tsss’ sound as you steam. This indicates you’re incorporating the right amount of air.
As the milk expands, gradually lower the pitcher to keep the wand submerged. Stop when the pitcher feels warm to the touch.
Swirl the milk gently to break up any large bubbles and achieve a glossy finish.
Enhance Home Brewing Skills
Improving your steaming skills can significantly enhance your home brewing game.
Practice with different milk types to understand how they behave. Whole milk is often easiest to work with, while plant-based milks may require different techniques.
Invest in a good quality milk pitcher. The shape and spout design can make a big difference in your pouring control.
Don’t forget temperature control. Use a thermometer until you develop a feel for the right temperature by touch.
Experiment with different steam wand positions and angles to find what works best for your setup.
Deconstructing Milk Frothing Methods
Understanding the science behind milk frothing can help you achieve consistent results. Let’s break down the process and explore how to perfect it.
Perfect the Frothing Process
Milk frothing involves two key steps: stretching and texturing. Stretching adds air to the milk, while texturing distributes the bubbles evenly.
-
Start by “stretching” the milk. Keep the wand tip just below the surface to incorporate air.
-
Once volume increases by about 20%, submerge the wand deeper for texturing.
-
Create a whirlpool effect to break down large bubbles and distribute heat evenly.
The goal is to create a smooth, velvety texture without any large bubbles or separation.
Remember, different drinks require different frothing techniques. For example, cappuccinos need more air than lattes.
Elevate Home Coffee Brewing
Mastering milk frothing can take your home coffee game to the next level.
Experiment with different frothing techniques for various coffee drinks. Try a drier foam for cappuccinos and a silkier texture for flat whites.
Pay attention to temperature. Milk starts to lose its sweetness above 150°F (65°C), so aim to stop just before this point.
Don’t be afraid to practice with water and a drop of dish soap. This helps you perfect your technique without wasting milk.
Lastly, remember that consistency is key. Develop a routine that works for you and stick to it for reliable results.
Latte Art Designs
Latte art is the perfect way to add a personal touch to your coffee creations. Let’s explore some designs that will impress your friends and family.
Wow Friends and Family
Start with simple designs like hearts and rosettas. These classics are impressive yet achievable for beginners.
As you gain confidence, try more complex patterns like tulips or swans. These designs require precise control and timing.
Don’t forget about etching! Use a thin tool to draw intricate designs on top of your poured art.
Remember, practice makes perfect. Don’t be discouraged if your first attempts don’t look like the pictures – even pros started somewhere!
Easy-to-Follow Art Guide
Here’s a simple guide to create a basic heart design:
-
Pour steamed milk into the center of your espresso shot.
-
As the cup fills, raise the pitcher slightly and increase flow.
-
When the cup is nearly full, move the pitcher forward quickly.
-
Pull through the design to create the heart’s point.
For more complex designs, break them down into simple shapes. A rosetta, for example, is just a series of small waves.
Experiment with different pouring speeds and heights to see how they affect your designs. Small adjustments can make a big difference.
Espresso and Milk: The Perfect Pairing
Espresso and milk form the foundation of many beloved coffee drinks. Understanding their relationship is key to creating the perfect cup.
Explore Symbiotic Relationships
Espresso and milk complement each other beautifully. The milk’s sweetness balances the espresso’s bitterness, while its creaminess softens the coffee’s acidity.
The proteins in milk interact with the espresso’s compounds, creating new flavors and textures. This is why a latte tastes different from drinking espresso and milk separately.
Temperature plays a crucial role too. Properly steamed milk enhances the espresso’s flavors without overpowering them.
Enhance Coffee Passion
Experimenting with different espresso-to-milk ratios can help you discover your perfect balance.
Try different milk types to see how they affect the flavor profile. Whole milk offers richness, while plant-based alternatives can add unique flavors.
Don’t forget about milk temperature. Slightly cooler milk (around 140°F) can bring out more sweetness, while hotter milk (up to 160°F) creates a bolder flavor.
Consider the coffee’s roast level when pairing. Darker roasts often pair well with creamier milk, while lighter roasts can shine with a lighter touch of milk.
Boost Your Barista Skills
Elevating your barista skills can transform your home coffee experience. Let’s explore some techniques to help you brew like a pro.
Expert Steaming Techniques
Mastering milk steaming is crucial for creating cafe-quality drinks at home.
Start by purging the steam wand to remove any condensation. This ensures you’re working with pure steam.
Position the wand just below the milk’s surface at a slight angle. This creates a whirlpool effect that incorporates air evenly.
Listen for a gentle ‘tsss’ sound – this indicates you’re adding the right amount of air. As the milk expands, gradually lower the pitcher.
Stop steaming when the pitcher feels warm to the touch, usually around 150°F (65°C). This preserves the milk’s natural sweetness.
Café-Quality Coffee at Home
Creating cafe-quality coffee at home is about attention to detail.
Invest in a good grinder and fresh, quality beans. Grind your coffee just before brewing for the best flavor.
Pay attention to your water quality and temperature. Use filtered water heated to around 200°F (93°C) for optimal extraction.
Experiment with different brewing methods to find your favorite. Each method brings out unique characteristics in the coffee.
Don’t forget about presentation. Serve your coffee in preheated cups and take time to create beautiful latte art.
The Art of Home Coffee Making
Crafting the perfect cup of coffee at home is a journey that starts with the beans and ends with the final presentation.
From Beans to Latte Art
The journey begins with selecting quality beans. Look for freshly roasted coffee from reputable sources.
Grind your beans just before brewing to preserve flavor. Adjust your grind size based on your brewing method.
Pay attention to your brewing technique, whether it’s pour-over, French press, or espresso. Each method requires specific skills.
Finally, add your personal touch with latte art. Even simple designs can elevate your coffee experience.
Embrace Full-Circle Experience
Home coffee making is about more than just the final product. It’s a full sensory experience.
Engage with the process: Listen to the coffee grinder, smell the freshly ground beans, watch the coffee bloom as you pour.
Experiment with different origins and roast levels to expand your palate. Keep a coffee journal to track your preferences.
Share your creations with friends and family. Coffee is best enjoyed in good company, and sharing your skills can be incredibly rewarding.
Remember, perfecting your coffee craft takes time. Embrace the learning process and enjoy every cup along the way.
The Science Behind Steamed Milk
Understanding the science of milk steaming can help you achieve consistent, delicious results. Let’s dive into the principles behind this crucial coffee skill.
Scientific Principles Explained
Milk steaming involves two key processes: aeration and emulsification.
Aeration introduces air into the milk, creating tiny bubbles. This is achieved by keeping the steam wand tip just below the milk’s surface.
Emulsification occurs as the milk is heated and the fat globules break down. This creates a smooth, velvety texture.
The proteins in milk play a crucial role. As they’re heated, they denature and form a stable foam structure.
Temperature is critical. Milk proteins start to denature around 100°F (38°C) and reach optimal texture around 140-150°F (60-65°C).
Refine Coffee Crafting Skills
Understanding these principles can help you troubleshoot common issues:
-
If your milk is too foamy, you’re likely introducing too much air during the initial stages.
-
If it’s not foamy enough, try aerating for a bit longer before submerging the wand.
-
If the texture is grainy, you may be overheating the milk. Use a thermometer until you develop a feel for the right temperature.
Experiment with different milk types to see how their protein and fat content affects steaming.
Remember, practice is key. The more you understand the science, the better you’ll be able to adjust your technique for perfect results every time.
Warm Up Your Morning Routine
Transform your mornings with the perfect cup of coffee. Let’s explore how to make your morning brew a highlight of your day.
Expert Steaming Advice
Start your day right with expertly steamed milk for your coffee.
Always begin with cold, fresh milk for the best results. The colder the milk, the more time you have to incorporate air before it heats up.
Listen for the right sound as you steam – a gentle ‘tsss’ indicates you’re adding the right amount of air.
Stop steaming when the pitcher is warm to the touch, usually around 150°F (65°C). This preserves the milk’s natural sweetness.
After steaming, tap the pitcher on the counter and swirl to break up any large bubbles. This ensures a smooth, velvety texture.
Perfect Morning Start
A great coffee routine can set the tone for your entire day.
Prepare as much as you can the night before. Set out your cup, grind your beans, and make sure your brewing equipment is clean and ready.
Experiment with different brew methods to find what works best for your morning schedule. A pour-over might be perfect for slow mornings, while an espresso machine could be ideal for busy days.
Don’t rush the process. Even if you’re short on time, taking a moment to enjoy your coffee can provide a valuable mental break before the day begins.
Consider pairing your coffee with a simple breakfast to make the most of your morning ritual.
Home Latte Art Techniques
Latte art isn’t just for cafes – you can create beautiful designs at home too. Let’s explore some beginner-friendly techniques to get you started.
Beginner-Friendly Techniques
Start with the basics: the heart and the rosetta. These classic designs form the foundation for more complex art.
For a heart:
-
Pour steamed milk into the center of your espresso.
-
As the cup fills, raise the pitcher slightly.
-
When nearly full, pull through quickly to create the point.
For a rosetta:
-
Start pouring from a higher position.
-
Lower the pitcher as you pour, moving side to side.
-
Pull through to create the stem.
Practice these techniques with water and a drop of dish soap before using milk. This helps you perfect your pouring without wasting ingredients.
Stunning Results at Home
Don’t be discouraged if your first attempts aren’t perfect. Latte art takes practice and patience.
Focus on getting your milk texture right first. Good microfoam is the key to beautiful latte art.
Experiment with different cups. Wide, shallow cups are often easier for beginners to work with.
Try etching simple designs with a toothpick if pouring proves challenging at first. This can still create impressive results.
Remember, even ‘failed’ attempts still taste delicious. Enjoy the process and celebrate small improvements along the way.
Elevate Your Coffee Game
Take your coffee skills to the next level with advanced latte art techniques and presentation tips that will impress any guest.
Sophisticated Latte Art Designs
Once you’ve mastered basic designs, try more complex patterns like tulips or swans.
For a tulip:
-
Pour a series of small, stacked circles.
-
Pull through to connect the circles into ‘petals’.
For a swan:
-
Create a heart as the body.
-
Add a curved line for the neck and a small dot for the head.
Practice controlling your pour speed and height. Small adjustments can make a big difference in your designs.
Don’t be afraid to combine techniques. A rosetta-heart or a tulip-swan can create unique, eye-catching designs.
Impress Your Guests
Presentation is key when serving coffee to guests.
Invest in quality cups that complement your coffee. Consider factors like heat retention and how they feel in the hand.
Create a complete sensory experience. Serve coffee on a tray with complementary treats like chocolate or biscotti.
Consider the lighting when presenting your latte art. Good lighting can make your designs pop and create a more impressive reveal.
Remember, confidence is key. Even if your design isn’t perfect, serve it with pride. Your guests will appreciate the effort and personal touch.
Perfecting Espresso and Milk Harmony
The magic of a great coffee drink lies in the perfect balance between espresso and milk. Let’s explore how to achieve this harmony.
Balance Coffee Creations
Understanding the characteristics of your espresso is crucial. Different roasts and origins will interact differently with milk.
Lighter roasts often have brighter, more acidic notes that can cut through milk well. Darker roasts tend to have bolder flavors that stand up to creamier milk drinks.
Consider the milk-to-espresso ratio carefully. A traditional cappuccino is 1/3 espresso, 1/3 steamed milk, and 1/3 foam, while a latte has more steamed milk and less foam.
Experiment with different milk types. Whole milk offers richness, while plant-based alternatives can add unique flavors to your drink.
Expert Brewing Guide
Start with freshly roasted, quality beans. Grind them just before brewing for the best flavor.
Pay attention to your espresso extraction. A well-pulled shot should take about 25-30 seconds an
